Commenting Metapost
Okay, okay, not really a metapost as this isn’t a post about posts but a post about commenting on this blog.
I wanted to introduce some commenting functionality as some of my posts (like this one!) are meant to help others facing similar issues and having the ability to ask/respond might benefit others.
I’m also planning on writing about stuff where I feel like I don’t have a good enough solution and would like to get feedback from others.
Context
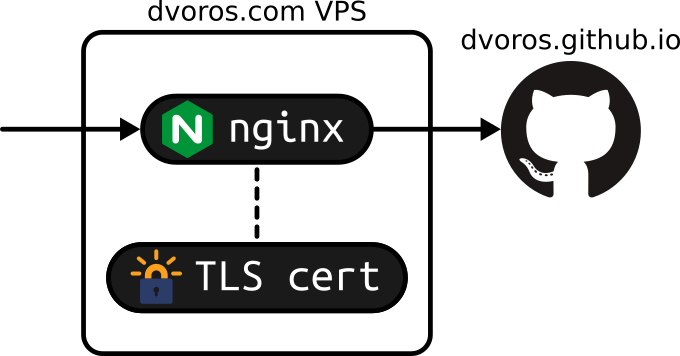
This website is backed by Github Pages. This repo holds all the source code and builds a static Hugo website automatically on every push.
I have an Nginx webserver hosted on a VPS (I’m not going to mention the cloud provider this time to avoid looking like paid content 🙂) that takes care of upgrading connections to HTTPS and proxies every request towards the Github Pages site.
Problem
With Hugo, it seems to be quite easy to use Disqus as your commenting engine and it is the default that most Hugo templates (including the one I’m using) are shipped with.
I didn’t want to use Disqus though, as:
- their free tier has ads
- it isn’t open-source
So I had to come up with something that checks these boxes and isn’t much more complicated to include in a Hugo site than Disqus.
Solution
There’s this list of alternative commenting engines for Hugo. After a quick look at some of them, I’ve decided to use Isso. It’s a Python server that you need to host yourself and a JS client that you need to include in your site.
Their quickstart guide is quite good and I’ve also found more detailed tutorials on the subject but none that ran Isso in Docker, even though it’s listed under the possible installation methods. I like to run everything I can in Docker to avoid polluting my VPS with the dependencies of everything I host.
Docker image
I’ve found a very simple Docker image that seemed to be working well: machies/isso
The only problem is that it has no tags other than latest. I needed a
reproducible solution so I’ve decided to tag machies/isso:latest as my own:
dvoros/isso:v1
Why avoid thelatesttag?latestimplies that it is subject to change. It just isn’t intended to be used in production (yes, I treat this blog as production 🙂). This post has a lot more background on the subject.
Docker configuration
You need to give your Isso server configuration to the Docker image and provide a volume to persist the comments. Here’s what I did:
 1# Create the config and db folders
 2mkdir -p /mnt/data/dvoros-com-isso/{config,db}
 3
 4# Initialize config
 5cat << EOF > /mnt/data/dvoros-com-isso/config/isso.conf
 6[general]
 7dbpath = /db/comments.db
 8host = https://dvoros.com/
 9[server]
10listen = http://0.0.0.0:8080/
11[guard]
12enabled = true
13ratelimit = 2
14direct-reply = 3
15reply-to-self = false
16require-author = true
17require-email = true
18EOF
Then I could launch the Isso server with:
1docker run -d --name isso \
2    -p 127.0.0.1:37758:8080
3    -v /mnt/data/dvoros-com-isso/config:/config \
4    -v /mnt/data/dvoros-com-isso/db:/db \
5    --restart always \
6    dvoros/isso:v1
This leaves me with the Isso server running on port 377758 (a random port) only accessible from localhost.
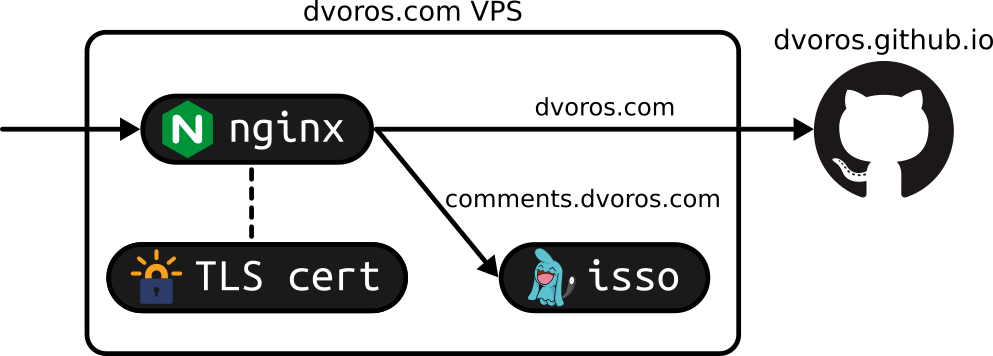
Nginx configuration
To be able to access the Isso server from the outside world (this serves the client JS code and is also called by the client) I had to set up a subdomain that is forwarded to the Isso server by Nginx.
The Nginx configuration for this subdomain:
 1server {
 2        server_name comments.dvoros.com;
 3
 4        location / {
 5                proxy_set_header X-Real-IP $remote_addr;
 6                proxy_set_header X-Forwarded-Proto https;
 7                proxy_set_header Host  $http_host;
 8                proxy_pass   http://127.0.0.1:37758/;
 9        }
10
11        listen [::]:443 ssl;
12        listen 443 ssl;
13
14        # SSL configs cropped from here...
15}
Things that I didn’t do
This method relies on having a TLS certificate and a DNS record for the subdomain. Luckily enough, I’ve already had a wildcard Let’s Encrypt certficate and a wildcard DNS record in place, so serving a new subdomain really only required extending the Nginx configuration.
Client code
With the server up and running on comments.dvoros.com, all I had to do was to
include the client at the bottom of every post page. This theme allows embedding
comments so I only had to extend that to work with Isso:
 1{{ if (eq .Site.Params.Comments.Engine "isso") }}
 2<div class="blog-post-comments">
 3    <script data-isso="//comments.dvoros.com/"
 4    data-isso-reply-to-self="false"
 5    data-isso-require-author="true"
 6    data-isso-require-email="true"
 7    src="//comments.dvoros.com/js/embed.min.js"></script>
 8
 9    <section id="isso-thread"></section>
10</div>
11{{ end }}
Conclusion
Now I have a working commenting engine, so you can share your thoughts below!
It might not hold up against malicious bots flooding the site with comments and
administering comments is tricky (need to use sqlite CLI
as I didn’t want to enable the admin UI for Isso), but I think it should be
sufficient for now.